Master the Art of Crafting Armor Stands in Minecraft!
Ever wondered how to display your enchanted Netherite armor or create an immersive RPG setting in Minecraft? The answer lies in mastering the recipe for an armor stand. A symbol of creativity and decoration, armor stands not only enhance the visual appeal of your builds but also serve as placeholders for your valuable equipment. Whether you’re a seasoned miner or a budding architect, this guide will walk you through crafting and using armor stands to elevate your Minecraft experience.
Ever wondered how to display your enchanted Netherite armor or create an immersive RPG setting in Minecraft? The answer lies in mastering the recipe for an armor stand. A symbol of creativity and decoration, armor stands not only enhance the visual appeal of your builds but also serve as placeholders for your valuable equipment. Whether you’re a seasoned miner or a budding architect, this guide will walk you through crafting and using armor stands to elevate your Minecraft experience.
Crafting Your Very Own Armor Stand in Minecraft
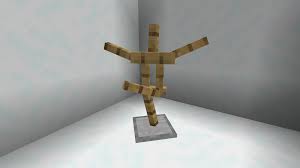
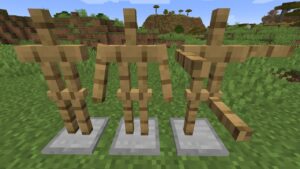
Dive into Minecraft crafting and discover the Armor Stand, a standout item that boosts your game. Ideal for showcasing enchanted gear or decorating your builds, the Armor Stand is a must-know for any player. Simple to craft, it turns your armor into more than just tools for adventure—they become key pieces of your world’s decor. Let’s explore how to create an Armor Stand and use it to add flair and personality to your Minecraft creations.
Step-by-Step Recipe for Armor Stand
Materials Needed:
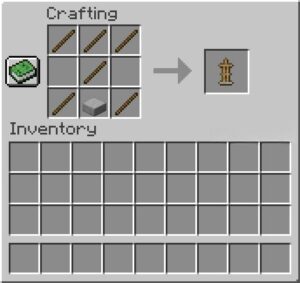
– 6 Sticks: Obtainable from breaking wooden blocks into planks and then into sticks.
– 1 Smooth Stone Slab: Crafted by smelting stone blocks to make smooth stone and then crafting them horizontally in a crafting table.
Crafting Process:
- Open Your Crafting Table: To start, access your crafting table to bring up the 3×3 crafting grid.
- Arrange the Sticks and Stone Slab:
- Top Row: Place 3 sticks across the top row, filling all three slots.
- Middle Row: Place 1 stick in the center slot, leaving the two side slots empty.
- Bottom Row: Place the Smooth Stone Slab in the center slot and a stick on either side of the slab.
- Collect Your Armor Stand:
- Once the materials are correctly arranged, the armor stand icon will appear in the result box. Now, you can drag the armor stand into your inventory for use.
Placement and Usage:
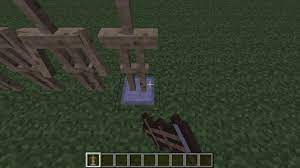
- To place the Armor Stand, simply select it from your inventory and right-click on the ground where you want it to stand. You can position it directly in front of you or at an angle for a more dynamic display.
Creative Uses of Armor Stands in Your Minecraft World
Decorative Displays
– Armor Galleries: Create a dedicated room or hall in your base to display each type of armor you’ve collected or crafted, from the common leather to the rare Netherite.
– Thematic Outfits: Use armor stands to showcase thematic outfits or uniforms that match the design of different areas of your world, like a miner’s outfit near mines or a diver’s suit by the ocean.
Interactive Scenes
– Mannequin NPCs: Armor stands can serve as non-playable characters (NPCs) in your adventure maps or RPG-style builds. Dress them up and position them to bring static scenes to life.
– Dynamic Dioramas: Combine armor stands with blocks, heads, and other items to create dynamic scenes, like a blacksmith working at an anvil or a group of villagers around a campfire.
Practical Uses
– Equipment Stations: Set up armor stands near your base’s entrance or in specific functional areas, so you can easily swap out equipment based on your activity—mining, farming, or combat.
– Safety Gear Stations: Place armor stands equipped with safety gear, like fire resistance armor or helmets with Respiration, near hazardous areas such as Nether portals or underwater entrances.
Redstone Integrations
– Moving Targets: Use pistons and slime blocks in Redstone contraptions to make armor stands move, creating challenging moving targets for archery practice.
– Secret Passages: Design a Redstone mechanism where an armor stand acts as a key; moving it to a specific position opens a hidden door or reveals a secret compartment.
Artistic Installations
– Statues and Sculptures: Get creative with armor stands to create statues and abstract art installations. Using various items and poses, you can craft everything from simple figures to complex sculptures.
– Thematic Decorations: For seasonal events or celebrations, use armor stands to set up decorations, like scarecrows for Halloween or dressed-up figures for a winter holiday scene.
Adventure Enhancements
– Quest Markers: In adventure maps, use armor stands to mark important locations or NPCs offering quests. Custom heads and thematic armor can indicate the nature of the quest or the character’s role.
– Loot Displays: Create visually appealing loot rooms where high-value items are displayed on armor stands, adding an extra layer of excitement when players find rare equipment.
Tips for Displaying Armor and Equipment
Consider Placement
– Strategic Positioning: Place armor stands in spots where they’ll be most noticed and appreciated, such as at the entrance of your base or in a dedicated armory room.
– Use Natural Lighting: Take advantage of natural lighting by placing armor stands near windows or under skylights to make the armor gleam and catch the player’s eye.
Create Themed Displays
– Biome-Specific Gear: Arrange armor stands to display gear appropriate for different biomes or environments around your base, such as ice armor near snowy areas or desert gear by sandy terrains.
– Historical Timelines: Showcase the progression of armor types from leather to Netherite in a museum-style display, telling the story of your adventure and achievements.
Enhance with Props and Backgrounds
– Decorate with Props: Use blocks and items as props to create scenes around your armor stands, such as placing weapons, shields, or thematic blocks nearby to add context to the display.
– Design Custom Backgrounds: Build custom backdrops for your armor stands to highlight specific themes or achievements, using materials that complement the armor’s color and design.
Utilize Dynamic Poses (Bedrock Edition)
– Experiment with Poses: If you’re playing in Bedrock Edition, take advantage of the pose feature to display your armor in dynamic ways, from action poses like swinging a sword to more relaxed stances.
– Create Scenes: Use multiple armor stands in various poses to create lively scenes, such as a battle reenactment or a group of adventurers preparing for a journey.
Interactive Displays
– Redstone Mechanics: Incorporate Redstone to create interactive displays, such as armor stands that rise from the ground when approached or rotate to showcase the armor from all angles.
– Swap Out Gear Easily: Organize your armor stands so that you can quickly swap out sets of armor depending on your in-game activities, making them functional parts of your daily Minecraft routine.
Label Your Displays
– Use Signage: Place signs or item frames near your armor stands to label the displays, whether it’s the type of armor, its enchantments, or the adventures you undertook while wearing it.
– Thematic Naming: Give your armor sets thematic names that reflect their purpose or the challenges you faced, adding a layer of storytelling to your display.
Innovating with Armor Stands: Advanced Ideas
Dynamic Statues and Art Pieces
– Animated Sculptures: Utilize pistons, slime blocks, and Redstone circuits to create moving art installations or statues that change poses, mimicking real-life motion.
– Interactive Art: Design installations where players’ actions—such as stepping on a pressure plate—change the configuration or poses of armor stands, creating an interactive art experience.
Redstone-Enhanced Displays
– Secret Triggers: Incorporate armor stands into Redstone contraptions as secret triggers. For example, placing an item on an armor stand could open a hidden door or reveal a treasure chest.
– Rotating Wardrobes: Create a rotating wardrobe system where pressing button cycles through different armor sets displayed on armor stands, allowing you to choose your outfit with ease.
Thematic Storytelling Tools
– Scene Creation: Use armor stands to set up detailed scenes that tell a story or create ambiance. For example, a dinner scene with armor stands positioned around a table, or a haunted forest with armor stands posed to look like ghosts.
– Historical Reenactments: Recreate famous battles or historical moments using armor stands as the characters. Use scripting or command blocks to animate the scenes for viewers.
Conclusion
In conclusion, armor stands in Minecraft are not just functional items but are a gateway to showcasing your creativity and achievements within the game. They allow you to display your prized armor sets, create dynamic scenes, and even add depth to your Minecraft builds and stories. Whether you’re a decorator at heart, an adventurer looking to exhibit your journeys, or a creator aiming to enhance your world’s narrative, mastering the recipe for armor stands opens up a new realm of possibilities.
Ready to transform your Minecraft spaces with the elegance and functionality of armor stands? Embark on your crafting journey today, bring your imaginative visions to life, and let your accomplishments stand proudly on display. For more Minecraft crafting guides, creative ideas, and tips to enhance your gameplay, head over to Apkafe. Start crafting, start displaying, and let the world see what you’ve achieved!
User Reviews


