Detailed Guide to Minecraft Server JAR: Download and Setup
Running your own Minecraft server opens up a world of possibilities, allowing you to create custom gameplay environments, including specialized servers like those focused on zombie survival. This guide will cover everything you need to know about the Minecraft server JAR, including where to download it and how to set it up.
Running your own Minecraft server opens up a world of possibilities, allowing you to create custom gameplay environments, including specialized servers like those focused on zombie survival. This guide will cover everything you need to know about the Minecraft server JAR, including where to download it and how to set it up.
If you’re new to Minecraft, learn Guide to Minecraft Server Lists
Understanding the Minecraft Server JAR
What is a Server JAR?
- Core Component: The server JAR file is the executable file that launches the Minecraft server. It contains all the necessary Java code to run the game server and manage its interactions.
- Java-Based: Since Minecraft is written in Java, the server JAR utilizes Java technology to operate. This means you’ll need to have Java installed on your server machine to run the server JAR.
How It Works
- Server Operations: When you run the Minecraft server JAR, it initializes the game server, loading the game world and starting the server’s network services to accept player connections.
- File Generation: On its initial run, the server JAR will generate several configuration files, including server.properties, which allows you to customize various aspects of the server such as game mode, player count, and more.
Key Features
- Customization: The server JAR is highly customizable. Administrators can edit the generated files to tweak server settings, adjust gameplay mechanics, and integrate custom mods and plugins.
- Updates and Versions: Mojang frequently updates the server JAR to introduce new features, fix bugs, and improve performance. Each version of the Minecraft game has a corresponding server JAR that supports that version’s features.
How to Download the Minecraft Server JAR
Step 1: Visit the Official Minecraft Website
- Official Website: Go to the official Minecraft website at minecraft.net. This is the safest source for downloading Minecraft software.
- Navigate to Downloads: Find the “Downloads” section on the website. This area provides links to various Minecraft versions, including the server files.
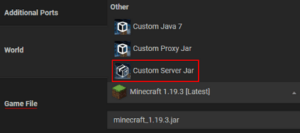
Step 2: Select the Appropriate Server File
- Choose the Version: Minecraft offers several versions of the server JAR, corresponding to different versions of the game. Make sure to choose the version that matches the Minecraft version you intend to play.
- Latest Version: For the best performance and latest features, download the most recent version of the server JAR. As of the latest update, this could be something like “Minecraft server JAR 1.20.1”.
Step 3: Download the Server JAR File
- Download Link: Once you have selected the appropriate version, click on the download link for the server JAR file. The file should start downloading to your computer.
- Security Check: Ensure your browser confirms that the download is safe. Reputable browsers will check files for malware during the download process.
Step 4: Save the File
- Choose a Location: Save the server JAR file in a designated folder where you plan to run your server. This helps keep all server-related files organized.
- Create a Server Folder: If you haven’t already, create a new folder to store all your Minecraft server files. This folder will contain the server JAR as well as any configuration files and world data.
Setting Up Your Minecraft Server
Step 1: Prepare the Server Environment
- Create a Dedicated Folder: Before running the server JAR, create a dedicated folder on your computer or server machine. This will be the home for all your server files, including configuration files, world data, and backups.
- Move the Server JAR: Place the downloaded server JAR file into this new folder.
Step 2: Initialize the Server
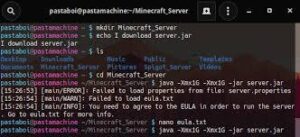
- Run the Server JAR: To start the server for the first time, open your command line interface and navigate to the directory containing the server JAR file. Run the command java -Xmx1024M -Xms1024M -jar minecraft_server.jar nogui. Adjust the memory allocation (Xmx and Xms) according to your machine’s capabilities.
- Agree to the EULA: Upon the first run, the server will create several files, including eula.txt. Open this file and change eula=false to eula=true to agree to Mojang’s End User License Agreement.
Step 3: Configure Server Settings
- Edit server.properties: This file controls all the key aspects of your server, such as the game mode, difficulty, and rules like PvP status. Open server.properties with a text editor and adjust the settings according to your preferences.
- Set server port: If necessary, change the server port in server.properties. The default port is 25565.
Step 4: Manage Server Resources
- Allocate Memory: Ensure that your server has enough memory allocated. The startup commands mentioned earlier can be adjusted to give more memory to the server, depending on the amount of RAM your machine has.
- Performance Optimization: Consider server optimization practices, such as adjusting view distance and tick rates to enhance server performance.
Step 5: Launch and Test the Server
- Start the Server: Run the server again using the same command as before. Check the server console for any errors and confirm that it starts up successfully.
- Connect Locally: Try connecting to the server from your own Minecraft client to ensure it’s running properly. Enter localhost in the Minecraft server address field if you are on the same network.
Connecting to Your Server
Step 1: Find Your Server’s IP Address
- Local Network Connection: If players are connecting within the same local network, they can use the local IP address of the server host machine. You can find this by running ipconfig (Windows) or ifconfig (Linux/Mac) in the command line.
- External Network Connection: For players outside your local network, you’ll need your public IP address. You can find this by visiting websites like whatismyip.com from the server host machine.
Step 2: Configure Network Settings
- Port Forwarding: Ensure that the port used by your Minecraft server (default is 25565) is forwarded on your router to the local IP address of the server host machine. This step is crucial for allowing external connections.
- Firewall Settings: Check that your firewall settings on the server host machine allow incoming connections on the Minecraft server port.
Step 3: Share Your Server Address
- Share IP and Port: Provide the public IP address and port number (if not the default) to your players. They will need to enter this information in their Minecraft client under the “Multiplayer” option to connect.
- Dynamic DNS Service: If your public IP changes frequently, consider using a Dynamic DNS service to assign a hostname to your IP address, making it easier for players to reconnect without needing to update the IP address continuously.
Step 4: Connecting to the Server
- Direct Connection: Players can connect by opening Minecraft, selecting ‘Multiplayer’, and then choosing ‘Add Server’ or ‘Direct Connect’. They should enter the server’s IP address and port.
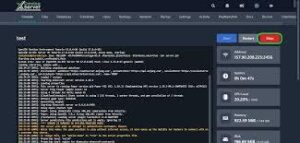
- Checking Server Status: Ensure the server is running when players are trying to connect. You can check the server console to see if it is active and to monitor incoming connections.
Step 5: Troubleshooting Common Issues
- Connection Timed Out: This often occurs if the port is not properly forwarded or the firewall is blocking the connection.
- Failed to Verify Username: Occurs when the server is in online mode, and the Mojang servers are down or unreachable. Ensure the server is set to online mode unless you intend to run a closed, offline server.
- Server Full: If you hit the player limit, either increase the max players in the server.properties file or upgrade your server resources if performance is a concern.
Conclusion:
Setting up and managing your own Minecraft server can greatly enhance your Minecraft experience, providing a personalized space for you and your friends to play. By following this guide, you can successfully download, set up, and maintain a Minecraft server, customized to your gaming preferences.
Ready to dive into the world of custom Minecraft servers? Download your Minecraft server JAR today, set up your unique gaming world, and start crafting unforgettable multiplayer adventures!
See more:
Guide to Free Minecraft Server Hosting
Guide to Minecraft Server Mods
User Reviews